使用Let's Encrypt申请免费通配符SSL证书的方法,今天在更新证书的时候发现生成证书有问题,原因是因为certbot-auto不再支持所有的操作系统:
1、错误提示:
Skipping bootstrap because certbot-auto is deprecated on this system.
Your system is not supported by certbot-auto anymore.
Certbot cannot be installed.
Please visit https://certbot.eff.org/ to check for other alternatives.
2、certbot-auto不被支持的原因:
The biggest factor that drove this deprecation now was Python 2 reaching its end-of-life this year. When this script was initially written 5 years ago, it was written to use Python 2 on most systems. While Python 2 is still receiving security support by various distros, the Python ecosystem has moved on and many of our dependencies are dropping support for Python 2. In order to continue to provide updates to our users, we have to get them on Python 3. We tried to migrate certbot-auto users to Python 3 in the past, but it's a ton of work and extremely error prone. Instead of trying to do this work and hope we didn't break anything (like we did last time 3), we decided to sunset the script in favor of other distribution methods.
3、解决方法:
certbot团队使用了基于snap的新的分发方法。
4、安装方法:
(1)、先安装epel:
yum install epel-release
(2)、安装snapd:
yum install snapd
(3)、启用snapd.socket:
systemctl enable --now snapd.socket
(4)、创建/var/lib/snapd/snap和/snap之间的链接:
ln -s /var/lib/snapd/snap /snap
(5)、重启系统(可选)(确保snap启动正常,否则可能提示error: too early for operation, device not yet seeded or device model not acknowledged):
reboot
(6)、更新snap至最新版本(如果没重启,第一次会出现上面的提示,再次执行即可正常,下面命令安装完成会提示snap命令不存在可断开远程,重新连接远程让snap的命令初始化):
snap install core
snap refresh core
(7)、卸载certbot(如果之前yum装过certbot):
yum remove certbot
(8)、删除certbot相关文件(如果之前yum装过certbot):
rm /usr/local/bin/certbot-auto
(9)、删除certbot附加软件包(如果之前yum装过certbot):
rm -rf /opt/eff.org/certbot
(11)、通过snap安装certbot:
snap install --classic certbot
(12)、创建/snap/bin/certbot软链接:
ln -s /snap/bin/certbot /usr/bin/certbot
5、申请证书(通配格式只能使用DNS验证,单域名可以用HTTP(s)和DNS验证)(新版默认使用ECC格式私钥,所以可以指定RSA格式私钥--key-type rsa)(不想输入邮箱还可以用--register-unsafely-without-email):
certbot certonly -d "1987619.com" -d "*.1987619.com" --manual --preferred-challenges dns-01 --server https://acme-v02.api.letsencrypt.org/directory --key-type rsa
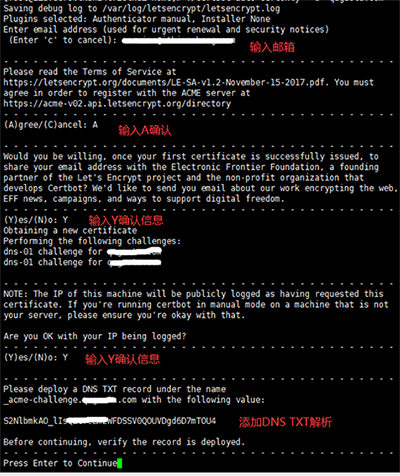
执行到这里的时候,我们需要先去域名添加对应的DNS TXT记录之后,再去回车继续执行,会显示验证成功并生成了ssl证书文件
Waiting for verification...
Cleaning up challenges
Subscribe to the EFF mailing list (email: service@1987619.com).

IMPORTANT NOTES:
 - Congratulations! Your certificate and chain have been saved at:
   /etc/letsencrypt/live/1987619.com/fullchain.pem
   Your key file has been saved at:
   /etc/letsencrypt/live/1987619.com/privkey.pem
   Your cert will expire on 2021-01-18. To obtain a new or tweaked
   version of this certificate in the future, simply run certbot-auto
   again. To non-interactively renew *all* of your certificates, run
   "certbot-auto renew"
 - If you like Certbot, please consider supporting our work by:

   Donating to ISRG / Let's Encrypt:   https://letsencrypt.org/donate
   Donating to EFF:                    https://eff.org/donate-le
也可以使用http请求验证(需要设置网站根目录的.well-known目录可以用http正常访问,如果用https验证的同理,程序会自动到网站的根目录下的.well-known目录里生成验证文件)
certbot certonly -d "1987619.com" -d "www.1987619.com" -a webroot --webroot-path={网站在服务器的根目录} --server https://acme-v02.api.letsencrypt.org/directory --key-type rsa
6、参数说明:
(1)、certbot相关参数:
certonly    表示只申请证书,Certbot有很多插件比如ngixn或者apache。不同的插件都可以申请证书,用户可以根据需要自行选择。
-d          为哪些主机申请证书。如果是通配符,输入 *.xxx.com(根据实际情况替换为你自己的域名)
--preferred-challenges dns-01      使用DNS方式校验域名所有权
-a/--authenticator webroot      使用HTTP方式校验域名所有权,也可以用--preferred-challenges http-01
--manual    手动设置
--server    Let's Encrypt ACME v2版本使用的服务器不同于v1版本,需要指定
(2)、校验域名的所有权的3种方式:
dns-01:给域名添加一个 DNS TXT 记录。
http-01:在域名对应的 Web 服务器下放置一个 HTTP well-known URL 资源文件。
tls-sni-01:在域名对应的 Web 服务器下放置一个 HTTPS well-known URL 资源文件。
7、注意事项:
(1)、申请通配符证书,只能使用 dns-01 的方式。
(2)、证书的有效期是90天
(3)、如果统配和根域名都要使用的话,生成的时候需要写成-d "1987619.com" -d "*.1987619.com" ,域名替换成自己的即可